The Basics
Posted: Fri Dec 02, 2011 11:34 am
Начнём перевод, текст очень правильный.
Introduction
Army stuff, it's great innit? Looking ally and that. But how does it all fit together? What goes in all those exiting pouches and pockets? How do you complete your ensemble so you look like a hollow-eyed Helmand veteran, rather than a paintballer, or spazzy Redcaps extra?
Well, for genuine authenticity you should stuff your pockets with porn, crusty bog paper and fag butts picked up during area cleaning. Your webbing should be disassembled and lying in the bottom of your locker - where you lagged on it after a heavy night on the Herforder - and missing most of the vital components, which you have either sold, lost or lent to a mate on the JNCO Cadre. Your kit will be immaculately ironed, but washed so rarely that the build up of dead skin cells and other detritus creates a form of human starch. Eschew twisties for that "I'm too f*cking operational for this shit" look, making only the loosest effort to tweak your trouser cuffs to keep the Razman off your back.
But first you have to complete basic training, and some of it is pretty bogus. That 'SAS' AI in your detachment, who told you to always carry a survival kit? Having a tobacco tin full of tampons, condoms and fish hooks may not have actually saved his life in Borneo like he told you. And that Corporal at the ATR, who made you carry a wash kit with a full size towel and family bar of soap in your belt kit? He's been driven over the edge by knowing that while he's beasting you, some Kingo Colour Boy is hanging out his wife's back doors singing "I feel like chicken tonight".
So, to whom (grammar) do you turn? ARRSE obviously. So if you're a Crow, Redarse, Nig, spazzy TV extra, or just one of those overexcited dingbats who incessantly post topics on Arrse like "Webbing!!!" or "What do I keep in my ammunition pouches!!?", pin your ears back, listen in and learn.
Disclaimer
The advice offered relates to training and operations in temperate environments, or Sennybridge at least. The opinions expressed in this article are the author's own, come from an Infantry perspective and are not necessarily endorsed by HM Armed Forces or any official body. In particular the author would counsel against telling your training screw or section commander "that's not the way I was told to do it", as you are likely to end up wearing your scrotum as a hat.
Combat Kit
CS95 is a multi-layered clothing range which can be worn in various combinations, to suit local climatic conditions and the prevailing megalomania of your chain of command. The basic layer system is shown here:

It is pretty self-explanatory, but a couple of points may be worth making:
The fleece is no longer DPM as it is no longer seen as outerwear (except by really scruffy officers). This is because it has the IRR properties of a Scotsman's arse in a searchlight beam.
The Gore-Tex rain suit is worn over the other stuff to keep it dry. Unless your outer layer(s) are already wet, in which case use the Gore-Tex below the wet stuff to stop you getting soaked through to the skin. It may sometimes be worth wearing your Gore-Tex under your smock so as to keep access to your pockets, or to protect it from ripping. And, yes, this may cut down on rustling noises; but they will be drowned out anyway by the sound of you crashing about in 25kg of webbing and body armour.
Don't forget that your body armour, and to some extent your webbing, count as layers, and that your body armour is waterproof.
The hood of the Gore-Tex jacket rolls away into its collar for storage. Roll it away neatly and never, ever wear it, you pikey, civvy, chav, mong. Wearing a hood shuts down most of the senses you need to function effectively on the battlefield, makes you look a cnut, and is only acceptable in extreme weather conditions, such as snow storms, dust storms, clouds of nerve gas or, for members of the RAF, actually having to go outside.
The 'shirt' is actually called a Lightweight Combat Jacket. It says so on the label. Point this out to anyone who won't let you wear it as an outer layer in the field.
The layer principle means you need to adjust what you are wearing depending on the temperature and how hard you are working. Similarly, adjust the clothing itself to keep a comfortable temperature. The kit is warmer if you close all the openings (neck, cuffs, hem) and items are tucked in to stop the air warmed by your body escaping. If you are overheating, do the opposite: loosen cuffs and roll them back, undo your smock (or just use the Velcro fastenings), loosen-off all the draw cords (which cadets and members of the RLC think have to be used at all times to make a sort of tutu). The point is that it is (mostly) up to you to sort yourself out. Don't mong it and become a heat casualty.
Speaking of mongs, please note: your helmet cover ties at the back. If the draw cords are at the front, you've got it on back to front and you look a twat.
Everybody's kit looks the same, so mark your surname and last 4 digits of your army number on your kit with permanent marker: inside and somewhere the ink won't soak through (this looks particularly crap on desert kit). Behind a pocket is best. Don't just name the collar tag, as anyone who nicks your kit will just cut it out.
Combat Kit Contents
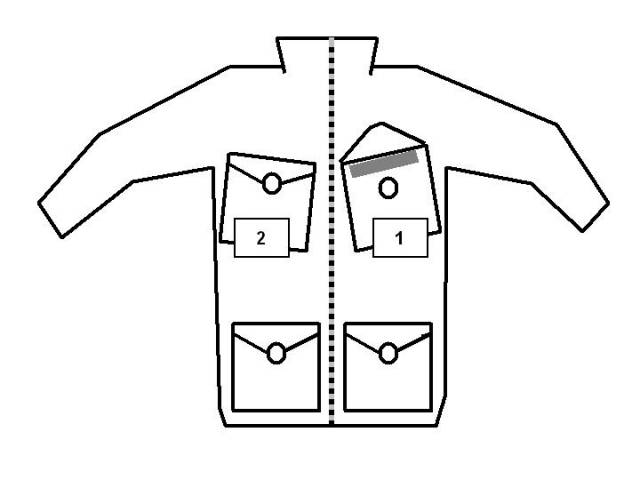
You should, wherever practical, use your combat jacket/smock as your main shell layer so you always have access to its contents. This saves constantly shifting key items around and inevitably losing them. You should keep the following in your smock:

1. Top Left Smock Pocket. Unless local SOPs say otherwise, this is the immediate aid pocket. Everyone keeps their basic trauma management kit (as opposed to First Aid Kit) in this pocket, so everyone knows where to look for it when treating a casualty (use the casualty's own trauma kit to treat them: you might need yours later). Keep the following in this pocket:
1 or 2x Emergency Care Bandages (ECB) or First Field Dressings (FFD) (you'll get issued a second on ops, or nick one). If you don't have ECB, carry 2 x elasticised bandages with you as well (somewhere), as these are a far more effective way of applying FFD and direct pressure.
Combat Application Tourniquet (CAT).
Morphine autoject, in protective "coffin".
Battlefield Casualty Drills Aide Memoire (Army Code 71638).
Whistle, looped to buttonhole of top flap.
Under the top flap, mark your Surname, Zap Number and Blood Group. If you are really keen, sew a strip of white tape on first. Don't write your blood group on your helmet cover, FFD outer or webbing, it looks gay and the chance of them still being with you at the point you receive whole blood is near zero. The British medical chain will always cross-match before transfusion anyway, so this is just in case. You could end up being cas-evaced by a Coalition ally or, God help you, to a local civilian hospital. In which case every little helps.
2. Top Right Smock Pocket. Keep the following in this pocket:
Notebook and pen / pencil in a plastic bag. The issue MoD notebook (MoD F383A (cover) and F383 (notebook insert)) is fine, and free from your company clerk. Don't waste money on 'waterproof' notebooks, they're shit. If they get wet the pages fuse together into a solid lump of plastic which is waterproof, but unusable as a notebook.
Torch. This should be looped though the buttonhole of the pocket flap in such a way that it is permanently fastened to you, but can be unlooped easily if you need to hand it to someone else. Choose one that uses army issue AA batteries. Maglites are fine in my view, and is what you'll be issued on ops, but whatever. Any red filter must be easily removable you can't see contours on maps in red light, however tactical it makes you feel.
3. Left Thigh Pocket. The left thigh ("map") pocket of the trousers is usually used as the immediate aid pocket if body armour is worn over the smock / lightweight combat jacket. Same contents as above, less the whistle.
4. Other Pockets. Other pockets should contain the following items which, together with everything else in your pockets, make up your basic 'survival kit':
Bic Lighter / Matches. Carry lots of cheap lighters, they're better at lighting hexi than matches, and when they run out will still produce a spark capable of igniting the padding in an FFD in a 'survival' situation. Which is gonna happen. No, really.
Penknife. Carry this in your trouser pocket, looped to a belt loop by 75 cm or so of paracord, again in such a way that it can be easily unlooped. Don't carry your knife in your smock pockets, as you tend to use it at waist, not face or chest, height; and, unless you have always wanted the nickname "Fingers", DO NOT use bungy cord or anything elastic to tie it on: in wet conditions the knife will be twanged back through your slippery palm, slicing you up like a Kray twin. The knife should be small, robust and have a tin opener (if not, carry a tin opener too). The issue army clasp knife is ideal, but rarely gets issued. You could carry a Leatherman instead (issued on ops) but avoid expensive, gucci brands; this is a working knife, not for big-timing it around the council estate.
Ear plugs. Handy when you know CAS is on the way.
Racing spoon. Plastic for preference, metal is fine, wooden is a health risk. MRE spoons are ideal (carry lots, spread through your kit), the gucci solution is one of those 'stronger than steel' Lexan jobs, from RVOps like this or this
Bog paper, waterproofed (the packs of tissues from the rat packs are ideal). Also, some KFC stylee 'moist towellette' sachets, nicked off the cookhouse table. For polishing around your piles.
Some food. Nothing too bulky, heavy or likely to melt/explode. Sweets usually.
15m green string. Opinions vary on exactly how much string you need on you, but some is definitely handy. Comms cord for ambushes, harbour sentries etc. (if needed in the Bowman age) should come from the big roll carried by your Platoon Sergeant, so this is just for general use. Use army issue 'green hairy', not para cord. You aren't going to want to chop up your precious para cord to help tie up a basha. Alternatively use a small box of dental floss: 100m weighs a few grams, you won't break it and it won't form a large dark green bundle of tangle in your pocket. It will also ensure you do not return from an exercise with cavities in your teeth, from eating all those sweets.
5. Other Items. You could also carry:
Silva compass. If you're going to spend your money on one item of kit, this is the one. It's not sexy, it's not ally, but it is definitely genuine SAS kit. Loop it onto a pocket flap so you don't lose it. Make sure it has graduations marked in mils (unless you are in the RAF - in which case Google "The Metric System" and "The 21st Century" and then stop wasting our money on Eurofighters).
Space Blanket. Might be worth having, if it's cold.
Webbing (Belt Kit)
Instructions for assembling 90 Pattern webbing (AKA Personal Load Carrying Equipment) are contained in Pamphlet No. 2, Fieldcraft, Battle Lessons and Exercises. Which you will never see, but at least you now know what to ask for.
Key points to note when assembling your belt kit are:
Get the belt right first. Before you fit any pouches (Booties call them 'pooches', because they're gay) to the belt, adjust it so when the buckle is at the front and the belt is snug around your waist, the 2 'D' rings at the back are aligned centrally. If you can't manage this get a different sized belt. There are 3 sizes: fat cnut (86 cm), normal (81 cm) and skinny dying bastard (71 cm). Your Colour Boy will be happy to help.
Add pouches working from the rear to the front. Ideally you want everything pushed around as far to the rear as you can, leaving your stomach clear so you can lie prone and still access your front (ammunition) pouches, which should be over your hips.
Attach the rear pouches using just the T bar and Velcro clips, not the webbing loops (DPM versions only). This will enable you to push the pouches closer together and help keep everything pushed around to the rear. Use all the fastenings and loops on the front 2 pouches, otherwise they will flap around when they are full of ammo and beat you like a cheap steak.
Attach the bayonet frog edge-on, using a bit of cord looped through 2 holes made in the webbing with a hot wire. This saves a lot of space on the belt. Don't fit the frog across the back of the yoke, as the bayonet will fall out, and don't fall for the "you can leave your bayonet in your daysack cos you'll have plenty of warning if you need it" crap. If you're going to do that, why not leave your ammo at home, cos you probably won't need all of it? It's a weapon. Carry it.
Fit the load spreader ('yoke') to the rear of the belt and adjust it to the right length. Some people prefer to wear their belt higher than others, but it should't be supporting your tits, loosen the yoke until the belt is somewhere around your waist. Then lock off the straps by feeding them back and forth through the buckle. Adjust the front straps, but don't lock them off as some adjustment will always be necessary. Finally adjust the lateral load spreader straps and lock them off as with the rear ones. Taping the straps should not then be necessary, but is always popular.
Thread one utility strap through the small loops on the inner faces of the pouches and adjust it to keep them pulled together and stop them flapping about. Before you do, slip a heavy-duty elastic band (from the vacuum packed NBC kit packets) around each pouch for attaching scrim to. Some people prefer running a bungee across the outer face of the pouches, through the scrim loops.
Belt Kit Contents
Your belt kit should contain only what you really need to make you effective during dismounted close combat, over a period of about 12-24 hours. You should carry the bare minimum of kit, which basically means ammo, bayonet, digging tool and water, with some food and a layer of clothing to keep you effective overnight or in poor weather. Put less essential items in your daysack (which you can dump if you need to shed weight).
The basic infantry belt kit layout is shown below. PONTIs don't get as many pouches, but you get the idea. Don't fit your respirator pouch to your belt; it turns out WMD were a lie, and only government ministers are that fat anyway. Wear it slung round your waist on its strap, if you need it.

Suggested contents for each pouch are as follows, but remember: it all depends on the enemy and the ground; and personal preference. Change the contents to suit the occasion.
1. Left Ammo Pouches. Magazines. (generic ammo loads and their distribution can be found in Pamphlet No. 1, The Infantry Company Group, The Fundamentals). Weapon cleaning kit (or at least enough of it to carry out cleaning during close operations: oil bottle, pull through and flannelette. Also have 6 barrel rods between a fireteam, to clear any barrel blockages). Magazine charger (hooked upside-down through the centre loop between the 2 pouches). Full mags should be placed in top down, so if the lips fail (which will never, ever happen with A2 magazines...) the rounds will end up in your pouch, not being sprayed everywhere when you open it. Facing the rounds away from you is probably also good practice.
2. Right Ammo Pouches. Magazines (part of your share from the LSW man's extra ammo) and grenades. (Grenades go in the right ammo pouch because most people will throw them right handed, mags go in the left pouch because you load left handed). Non-infantry personnel should be aware that infantry instructors have strong views on using ammo pouches for items that don't keep your weapon firing. Don't be surprised if your brilliant idea to put your magazines in your bergen to make more room for Haribo is met by a torrent of invective, culminating with you being beaten to death with your own testicles.
3. Bayonet, in frog fitted edge-on to belt as described earlier.
4. Waterbottle Pouch. This contains basic 'survival' gear to keep you alive and functioning, if not actually that comfortable, for 24 hours. Contains, waterbottle (obviously) with NBC cap, sitting in a metal mug (for heating water in). A space blanket is also handy, if not in your smock. Keep a pouched meal and/or brew kit, 2x hexi blocks and a lighter/matches, all wrapped up in a plastic bag (an MRE packet is ideal), in the small internal pocket (Millbank pocket) as an emergency ration. Water purifying tables (from the rat packs) go in the little pocket under the top flap of the pouch.
5. ETH (Entrenching Tool Hand) Pouch. If the enemy has a credible indirect fire capability then you need a digging tool, with you, on your belt kit. If not, then either replace the ETH pouch with another utility pouch, which you can fill with 'comfort items' or extra ammo as needed, or take the ETH out of the pouch, put your water bottle in it and use the extra space in your waterbottle pouch. Admittedly the ETH is a pretty shit digging tool, but it is streets ahead of your racing spoon. Talk to a few people who have been under artillery fire for real before you discount it completely.
6. Utility Pouch. This pouch is for whatever you need at the time. Routinely keep your Gore-Tex smock, cam cream and snack meal from your rat pack in here, unless you need extra space for anything more relevant to the task you are actually doing. You could also keep a small First Aid Kit and sewing kit in here (or in your waterbottle pouch). Note that utility pouches can be used as ammo pouches and have the same yoke fittings for this purpose. They are better for carrying belted ammunition and grenades.
7. Helmet (Not Shown). You need to be able to clip your helmet to your webbing and get it off again quickly. One option is to fix a 58 pattern spring loaded clip (as used to attach the poncho roll) or mini karabiner onto your webbing somewhere, preferably over the utility pouch. You can then clip the helmet on by the rear harness attachment ring. However you do it though, avoid the Little Red Riding Hood effect, caused by hanging your helmet from its chinstrap like a picnic basket. Because you will look shit.
8. Respirator Pouch (not shown). Contents should be as per JSP 410 'Survive To Fight' (current edition). Don't put anything else in the pouch, and don't use a respirator pouch as 'butt pack'. It is really, really wank.
Avoid the temptation to put extra pouches on the belt, you will just end up carrying non-essential extra weight (if you have room on your belt you probably already are, you fat cnut). Don't tape FFDs to your kit, as your webbing will probably the first thing to be ditched during your initial casevac: why carry a 105 kg man out of a killing area when you can drop his kit and carry an 80 kg man instead? Name your webbing on the inside face.
Gucci Kit
Current British Army clothing and personal equipment is excellent. No joke. There is no need to buy smocks, webbing, boots; the stuff you get issued does the job well, is free and gets replaced when it wears out. Be honest with yourself. You don't need a para smock, you want one. Cos it'll make you look ally. The issue CS95 Field Jacket is much better, but people persist in wearing para smocks. Why? Because it make them look like members of The Parachute Regiment, and the Parachute Regiment are ally (strangely enough the Parachute Regiment wear them for the same reason and don't give me that crap about needing the crotch flap, it doesn't stop you jumping in SAS smocks does it?). Boots are about the only item that you could justifiably buy, as everyone's feet are different and issue boots are designed for some mythical everyman. Even so, examine your motives carefully. Remember: girls don't like boys, girls like cars and money. Every penny you spend on army kit is putting you further away from getting laid.
But; you're gonna do it anyway, so here is some advice:
Buy Useful Stuff. Silva compasses, a decent pocket knife, pace counters, Ortlieb bags, the components of your first aid kit; these are all useful. Even US 'tiger's eye' helmet bands, kneepads, headtorches, a spare Utility pouch or a decent daysack are improvements to your basic kit. 'Rambo' knives, naff smocks with a million pockets, anything with the words 'survival' or 'special operations' in their name; these are not useful, are usually expensive, and will make you look like a TA storeman.
Boots. Before buying Gore-Tex boots, remember they are not waterproof if you kneel in a stream or when rain runs down your legs into the top of them. They do, however, take for fecking ever to dry out once wet. Conversely, Magnums have the waterproof properties of a household sponge, and also take for fecking ever to dry out once wet. Issue Assault Boots are reasonably waterproof and dry out fairly quickly. A spare pair of socks is a lot cheaper than a pair of Lowas.
Buy Issue Kit. Kit that is on issue (but not necessarily to you) will meet proper military specifications, including IRR protection and robustness. This should still hold good for foreign issue kit (although remember some armies will have different imperatives). If you buy Webtex or other low spec stuff, you risk night sights making you glow like a Ukrainian fire fighter. The other advantage of (British) issue kit is that if you stay in long enough, you will eventually get a chance to exchange it for free. Which you won't be able to do with your Arktis ops vest.
Buy Through the System. British kit can, apparently, be purchased through the system for wholesale prices, according to a letter in Soldier magazine. Yeah, right. Still, Col Silas Suchanek of the Defence Clothing Integrated Project Team writes: The new Operational Clothing Catalogue (JSP 529) provides details of the full range of operational clothing and includes pictures, sizes, guide prices and wear-and-care instructions. The windproof smock (NSN 8415-99-132-3951) guide price is £36. The mechanisms for soldiers to buy items of combat clothing exist but it is more a question of the chain of command sanctioning such purchases. In other words, you haven't got a hope. Still, in your own time, go on.
Think About It. Do without the item of kit you want to buy for a bit and see if you really need or want it. Also think about what wearing / possessing this item is going to say about you. Wearing a sniper smock when you are not a qualified sniper does not make people think you are a steely-eyed harbinger of death. It makes them think you are a twerp.
Introduction
Army stuff, it's great innit? Looking ally and that. But how does it all fit together? What goes in all those exiting pouches and pockets? How do you complete your ensemble so you look like a hollow-eyed Helmand veteran, rather than a paintballer, or spazzy Redcaps extra?
Well, for genuine authenticity you should stuff your pockets with porn, crusty bog paper and fag butts picked up during area cleaning. Your webbing should be disassembled and lying in the bottom of your locker - where you lagged on it after a heavy night on the Herforder - and missing most of the vital components, which you have either sold, lost or lent to a mate on the JNCO Cadre. Your kit will be immaculately ironed, but washed so rarely that the build up of dead skin cells and other detritus creates a form of human starch. Eschew twisties for that "I'm too f*cking operational for this shit" look, making only the loosest effort to tweak your trouser cuffs to keep the Razman off your back.
But first you have to complete basic training, and some of it is pretty bogus. That 'SAS' AI in your detachment, who told you to always carry a survival kit? Having a tobacco tin full of tampons, condoms and fish hooks may not have actually saved his life in Borneo like he told you. And that Corporal at the ATR, who made you carry a wash kit with a full size towel and family bar of soap in your belt kit? He's been driven over the edge by knowing that while he's beasting you, some Kingo Colour Boy is hanging out his wife's back doors singing "I feel like chicken tonight".
So, to whom (grammar) do you turn? ARRSE obviously. So if you're a Crow, Redarse, Nig, spazzy TV extra, or just one of those overexcited dingbats who incessantly post topics on Arrse like "Webbing!!!" or "What do I keep in my ammunition pouches!!?", pin your ears back, listen in and learn.
Disclaimer
The advice offered relates to training and operations in temperate environments, or Sennybridge at least. The opinions expressed in this article are the author's own, come from an Infantry perspective and are not necessarily endorsed by HM Armed Forces or any official body. In particular the author would counsel against telling your training screw or section commander "that's not the way I was told to do it", as you are likely to end up wearing your scrotum as a hat.
Combat Kit
CS95 is a multi-layered clothing range which can be worn in various combinations, to suit local climatic conditions and the prevailing megalomania of your chain of command. The basic layer system is shown here:
It is pretty self-explanatory, but a couple of points may be worth making:
The fleece is no longer DPM as it is no longer seen as outerwear (except by really scruffy officers). This is because it has the IRR properties of a Scotsman's arse in a searchlight beam.
The Gore-Tex rain suit is worn over the other stuff to keep it dry. Unless your outer layer(s) are already wet, in which case use the Gore-Tex below the wet stuff to stop you getting soaked through to the skin. It may sometimes be worth wearing your Gore-Tex under your smock so as to keep access to your pockets, or to protect it from ripping. And, yes, this may cut down on rustling noises; but they will be drowned out anyway by the sound of you crashing about in 25kg of webbing and body armour.
Don't forget that your body armour, and to some extent your webbing, count as layers, and that your body armour is waterproof.
The hood of the Gore-Tex jacket rolls away into its collar for storage. Roll it away neatly and never, ever wear it, you pikey, civvy, chav, mong. Wearing a hood shuts down most of the senses you need to function effectively on the battlefield, makes you look a cnut, and is only acceptable in extreme weather conditions, such as snow storms, dust storms, clouds of nerve gas or, for members of the RAF, actually having to go outside.
The 'shirt' is actually called a Lightweight Combat Jacket. It says so on the label. Point this out to anyone who won't let you wear it as an outer layer in the field.
The layer principle means you need to adjust what you are wearing depending on the temperature and how hard you are working. Similarly, adjust the clothing itself to keep a comfortable temperature. The kit is warmer if you close all the openings (neck, cuffs, hem) and items are tucked in to stop the air warmed by your body escaping. If you are overheating, do the opposite: loosen cuffs and roll them back, undo your smock (or just use the Velcro fastenings), loosen-off all the draw cords (which cadets and members of the RLC think have to be used at all times to make a sort of tutu). The point is that it is (mostly) up to you to sort yourself out. Don't mong it and become a heat casualty.
Speaking of mongs, please note: your helmet cover ties at the back. If the draw cords are at the front, you've got it on back to front and you look a twat.
Everybody's kit looks the same, so mark your surname and last 4 digits of your army number on your kit with permanent marker: inside and somewhere the ink won't soak through (this looks particularly crap on desert kit). Behind a pocket is best. Don't just name the collar tag, as anyone who nicks your kit will just cut it out.
Combat Kit Contents
You should, wherever practical, use your combat jacket/smock as your main shell layer so you always have access to its contents. This saves constantly shifting key items around and inevitably losing them. You should keep the following in your smock:
1. Top Left Smock Pocket. Unless local SOPs say otherwise, this is the immediate aid pocket. Everyone keeps their basic trauma management kit (as opposed to First Aid Kit) in this pocket, so everyone knows where to look for it when treating a casualty (use the casualty's own trauma kit to treat them: you might need yours later). Keep the following in this pocket:
1 or 2x Emergency Care Bandages (ECB) or First Field Dressings (FFD) (you'll get issued a second on ops, or nick one). If you don't have ECB, carry 2 x elasticised bandages with you as well (somewhere), as these are a far more effective way of applying FFD and direct pressure.
Combat Application Tourniquet (CAT).
Morphine autoject, in protective "coffin".
Battlefield Casualty Drills Aide Memoire (Army Code 71638).
Whistle, looped to buttonhole of top flap.
Under the top flap, mark your Surname, Zap Number and Blood Group. If you are really keen, sew a strip of white tape on first. Don't write your blood group on your helmet cover, FFD outer or webbing, it looks gay and the chance of them still being with you at the point you receive whole blood is near zero. The British medical chain will always cross-match before transfusion anyway, so this is just in case. You could end up being cas-evaced by a Coalition ally or, God help you, to a local civilian hospital. In which case every little helps.
2. Top Right Smock Pocket. Keep the following in this pocket:
Notebook and pen / pencil in a plastic bag. The issue MoD notebook (MoD F383A (cover) and F383 (notebook insert)) is fine, and free from your company clerk. Don't waste money on 'waterproof' notebooks, they're shit. If they get wet the pages fuse together into a solid lump of plastic which is waterproof, but unusable as a notebook.
Torch. This should be looped though the buttonhole of the pocket flap in such a way that it is permanently fastened to you, but can be unlooped easily if you need to hand it to someone else. Choose one that uses army issue AA batteries. Maglites are fine in my view, and is what you'll be issued on ops, but whatever. Any red filter must be easily removable you can't see contours on maps in red light, however tactical it makes you feel.
3. Left Thigh Pocket. The left thigh ("map") pocket of the trousers is usually used as the immediate aid pocket if body armour is worn over the smock / lightweight combat jacket. Same contents as above, less the whistle.
4. Other Pockets. Other pockets should contain the following items which, together with everything else in your pockets, make up your basic 'survival kit':
Bic Lighter / Matches. Carry lots of cheap lighters, they're better at lighting hexi than matches, and when they run out will still produce a spark capable of igniting the padding in an FFD in a 'survival' situation. Which is gonna happen. No, really.
Penknife. Carry this in your trouser pocket, looped to a belt loop by 75 cm or so of paracord, again in such a way that it can be easily unlooped. Don't carry your knife in your smock pockets, as you tend to use it at waist, not face or chest, height; and, unless you have always wanted the nickname "Fingers", DO NOT use bungy cord or anything elastic to tie it on: in wet conditions the knife will be twanged back through your slippery palm, slicing you up like a Kray twin. The knife should be small, robust and have a tin opener (if not, carry a tin opener too). The issue army clasp knife is ideal, but rarely gets issued. You could carry a Leatherman instead (issued on ops) but avoid expensive, gucci brands; this is a working knife, not for big-timing it around the council estate.
Ear plugs. Handy when you know CAS is on the way.
Racing spoon. Plastic for preference, metal is fine, wooden is a health risk. MRE spoons are ideal (carry lots, spread through your kit), the gucci solution is one of those 'stronger than steel' Lexan jobs, from RVOps like this or this
Bog paper, waterproofed (the packs of tissues from the rat packs are ideal). Also, some KFC stylee 'moist towellette' sachets, nicked off the cookhouse table. For polishing around your piles.
Some food. Nothing too bulky, heavy or likely to melt/explode. Sweets usually.
15m green string. Opinions vary on exactly how much string you need on you, but some is definitely handy. Comms cord for ambushes, harbour sentries etc. (if needed in the Bowman age) should come from the big roll carried by your Platoon Sergeant, so this is just for general use. Use army issue 'green hairy', not para cord. You aren't going to want to chop up your precious para cord to help tie up a basha. Alternatively use a small box of dental floss: 100m weighs a few grams, you won't break it and it won't form a large dark green bundle of tangle in your pocket. It will also ensure you do not return from an exercise with cavities in your teeth, from eating all those sweets.
5. Other Items. You could also carry:
Silva compass. If you're going to spend your money on one item of kit, this is the one. It's not sexy, it's not ally, but it is definitely genuine SAS kit. Loop it onto a pocket flap so you don't lose it. Make sure it has graduations marked in mils (unless you are in the RAF - in which case Google "The Metric System" and "The 21st Century" and then stop wasting our money on Eurofighters).
Space Blanket. Might be worth having, if it's cold.
Webbing (Belt Kit)
Instructions for assembling 90 Pattern webbing (AKA Personal Load Carrying Equipment) are contained in Pamphlet No. 2, Fieldcraft, Battle Lessons and Exercises. Which you will never see, but at least you now know what to ask for.
Key points to note when assembling your belt kit are:
Get the belt right first. Before you fit any pouches (Booties call them 'pooches', because they're gay) to the belt, adjust it so when the buckle is at the front and the belt is snug around your waist, the 2 'D' rings at the back are aligned centrally. If you can't manage this get a different sized belt. There are 3 sizes: fat cnut (86 cm), normal (81 cm) and skinny dying bastard (71 cm). Your Colour Boy will be happy to help.
Add pouches working from the rear to the front. Ideally you want everything pushed around as far to the rear as you can, leaving your stomach clear so you can lie prone and still access your front (ammunition) pouches, which should be over your hips.
Attach the rear pouches using just the T bar and Velcro clips, not the webbing loops (DPM versions only). This will enable you to push the pouches closer together and help keep everything pushed around to the rear. Use all the fastenings and loops on the front 2 pouches, otherwise they will flap around when they are full of ammo and beat you like a cheap steak.
Attach the bayonet frog edge-on, using a bit of cord looped through 2 holes made in the webbing with a hot wire. This saves a lot of space on the belt. Don't fit the frog across the back of the yoke, as the bayonet will fall out, and don't fall for the "you can leave your bayonet in your daysack cos you'll have plenty of warning if you need it" crap. If you're going to do that, why not leave your ammo at home, cos you probably won't need all of it? It's a weapon. Carry it.
Fit the load spreader ('yoke') to the rear of the belt and adjust it to the right length. Some people prefer to wear their belt higher than others, but it should't be supporting your tits, loosen the yoke until the belt is somewhere around your waist. Then lock off the straps by feeding them back and forth through the buckle. Adjust the front straps, but don't lock them off as some adjustment will always be necessary. Finally adjust the lateral load spreader straps and lock them off as with the rear ones. Taping the straps should not then be necessary, but is always popular.
Thread one utility strap through the small loops on the inner faces of the pouches and adjust it to keep them pulled together and stop them flapping about. Before you do, slip a heavy-duty elastic band (from the vacuum packed NBC kit packets) around each pouch for attaching scrim to. Some people prefer running a bungee across the outer face of the pouches, through the scrim loops.
Belt Kit Contents
Your belt kit should contain only what you really need to make you effective during dismounted close combat, over a period of about 12-24 hours. You should carry the bare minimum of kit, which basically means ammo, bayonet, digging tool and water, with some food and a layer of clothing to keep you effective overnight or in poor weather. Put less essential items in your daysack (which you can dump if you need to shed weight).
The basic infantry belt kit layout is shown below. PONTIs don't get as many pouches, but you get the idea. Don't fit your respirator pouch to your belt; it turns out WMD were a lie, and only government ministers are that fat anyway. Wear it slung round your waist on its strap, if you need it.
Suggested contents for each pouch are as follows, but remember: it all depends on the enemy and the ground; and personal preference. Change the contents to suit the occasion.
1. Left Ammo Pouches. Magazines. (generic ammo loads and their distribution can be found in Pamphlet No. 1, The Infantry Company Group, The Fundamentals). Weapon cleaning kit (or at least enough of it to carry out cleaning during close operations: oil bottle, pull through and flannelette. Also have 6 barrel rods between a fireteam, to clear any barrel blockages). Magazine charger (hooked upside-down through the centre loop between the 2 pouches). Full mags should be placed in top down, so if the lips fail (which will never, ever happen with A2 magazines...) the rounds will end up in your pouch, not being sprayed everywhere when you open it. Facing the rounds away from you is probably also good practice.
2. Right Ammo Pouches. Magazines (part of your share from the LSW man's extra ammo) and grenades. (Grenades go in the right ammo pouch because most people will throw them right handed, mags go in the left pouch because you load left handed). Non-infantry personnel should be aware that infantry instructors have strong views on using ammo pouches for items that don't keep your weapon firing. Don't be surprised if your brilliant idea to put your magazines in your bergen to make more room for Haribo is met by a torrent of invective, culminating with you being beaten to death with your own testicles.
3. Bayonet, in frog fitted edge-on to belt as described earlier.
4. Waterbottle Pouch. This contains basic 'survival' gear to keep you alive and functioning, if not actually that comfortable, for 24 hours. Contains, waterbottle (obviously) with NBC cap, sitting in a metal mug (for heating water in). A space blanket is also handy, if not in your smock. Keep a pouched meal and/or brew kit, 2x hexi blocks and a lighter/matches, all wrapped up in a plastic bag (an MRE packet is ideal), in the small internal pocket (Millbank pocket) as an emergency ration. Water purifying tables (from the rat packs) go in the little pocket under the top flap of the pouch.
5. ETH (Entrenching Tool Hand) Pouch. If the enemy has a credible indirect fire capability then you need a digging tool, with you, on your belt kit. If not, then either replace the ETH pouch with another utility pouch, which you can fill with 'comfort items' or extra ammo as needed, or take the ETH out of the pouch, put your water bottle in it and use the extra space in your waterbottle pouch. Admittedly the ETH is a pretty shit digging tool, but it is streets ahead of your racing spoon. Talk to a few people who have been under artillery fire for real before you discount it completely.
6. Utility Pouch. This pouch is for whatever you need at the time. Routinely keep your Gore-Tex smock, cam cream and snack meal from your rat pack in here, unless you need extra space for anything more relevant to the task you are actually doing. You could also keep a small First Aid Kit and sewing kit in here (or in your waterbottle pouch). Note that utility pouches can be used as ammo pouches and have the same yoke fittings for this purpose. They are better for carrying belted ammunition and grenades.
7. Helmet (Not Shown). You need to be able to clip your helmet to your webbing and get it off again quickly. One option is to fix a 58 pattern spring loaded clip (as used to attach the poncho roll) or mini karabiner onto your webbing somewhere, preferably over the utility pouch. You can then clip the helmet on by the rear harness attachment ring. However you do it though, avoid the Little Red Riding Hood effect, caused by hanging your helmet from its chinstrap like a picnic basket. Because you will look shit.
8. Respirator Pouch (not shown). Contents should be as per JSP 410 'Survive To Fight' (current edition). Don't put anything else in the pouch, and don't use a respirator pouch as 'butt pack'. It is really, really wank.
Avoid the temptation to put extra pouches on the belt, you will just end up carrying non-essential extra weight (if you have room on your belt you probably already are, you fat cnut). Don't tape FFDs to your kit, as your webbing will probably the first thing to be ditched during your initial casevac: why carry a 105 kg man out of a killing area when you can drop his kit and carry an 80 kg man instead? Name your webbing on the inside face.
Gucci Kit
Current British Army clothing and personal equipment is excellent. No joke. There is no need to buy smocks, webbing, boots; the stuff you get issued does the job well, is free and gets replaced when it wears out. Be honest with yourself. You don't need a para smock, you want one. Cos it'll make you look ally. The issue CS95 Field Jacket is much better, but people persist in wearing para smocks. Why? Because it make them look like members of The Parachute Regiment, and the Parachute Regiment are ally (strangely enough the Parachute Regiment wear them for the same reason and don't give me that crap about needing the crotch flap, it doesn't stop you jumping in SAS smocks does it?). Boots are about the only item that you could justifiably buy, as everyone's feet are different and issue boots are designed for some mythical everyman. Even so, examine your motives carefully. Remember: girls don't like boys, girls like cars and money. Every penny you spend on army kit is putting you further away from getting laid.
But; you're gonna do it anyway, so here is some advice:
Buy Useful Stuff. Silva compasses, a decent pocket knife, pace counters, Ortlieb bags, the components of your first aid kit; these are all useful. Even US 'tiger's eye' helmet bands, kneepads, headtorches, a spare Utility pouch or a decent daysack are improvements to your basic kit. 'Rambo' knives, naff smocks with a million pockets, anything with the words 'survival' or 'special operations' in their name; these are not useful, are usually expensive, and will make you look like a TA storeman.
Boots. Before buying Gore-Tex boots, remember they are not waterproof if you kneel in a stream or when rain runs down your legs into the top of them. They do, however, take for fecking ever to dry out once wet. Conversely, Magnums have the waterproof properties of a household sponge, and also take for fecking ever to dry out once wet. Issue Assault Boots are reasonably waterproof and dry out fairly quickly. A spare pair of socks is a lot cheaper than a pair of Lowas.
Buy Issue Kit. Kit that is on issue (but not necessarily to you) will meet proper military specifications, including IRR protection and robustness. This should still hold good for foreign issue kit (although remember some armies will have different imperatives). If you buy Webtex or other low spec stuff, you risk night sights making you glow like a Ukrainian fire fighter. The other advantage of (British) issue kit is that if you stay in long enough, you will eventually get a chance to exchange it for free. Which you won't be able to do with your Arktis ops vest.
Buy Through the System. British kit can, apparently, be purchased through the system for wholesale prices, according to a letter in Soldier magazine. Yeah, right. Still, Col Silas Suchanek of the Defence Clothing Integrated Project Team writes: The new Operational Clothing Catalogue (JSP 529) provides details of the full range of operational clothing and includes pictures, sizes, guide prices and wear-and-care instructions. The windproof smock (NSN 8415-99-132-3951) guide price is £36. The mechanisms for soldiers to buy items of combat clothing exist but it is more a question of the chain of command sanctioning such purchases. In other words, you haven't got a hope. Still, in your own time, go on.
Think About It. Do without the item of kit you want to buy for a bit and see if you really need or want it. Also think about what wearing / possessing this item is going to say about you. Wearing a sniper smock when you are not a qualified sniper does not make people think you are a steely-eyed harbinger of death. It makes them think you are a twerp.